Create a Zapier Integration With Nextjs13

Published: 2022-12-03
There’s a lack of new, updated tutorials for Zapier integrations on the web.
Many that I found while creating my own integration relied on the legacy web builder for Zapier and weren’t updated for the current Zapier CLI.
The new UI builder is clunky, and doesn’t support all the options out of the box.
This honestly was a big case of trial & error for me to setup for my app last night. I was banging my head against the wall for hours and couldn’t sleep. Hopefully you can avoid that with this tutorial.
Why Zapier?
Zapier helps people connect multiple apps / apis on the web and can be really helpful for getting customers for your SaaS app. Zapier will use web hooks / REST endpoints to transfer data from one app to another.
Here are the steps for creating a sample integration.
- Initalize your Zapier ‘app’ with the CLI
- Create your functions called ‘triggers/actions’
- Create endpoints to authenticate users / post data with Zapier’s api
- Test & make sure it all works
Here is a link to the official Zapier docs for even more breakdown of the CLI.
Let’s get started.
# install the CLI globally
npm install -g zapier-platform-cli

# setup auth to Zapier's platform with a deploy key
zapier login

# create a directory with the minimum required files
zapier init example-app

# move into the new directory
cd example-app

# install all the libraries needed for your app
npm install
This will create a sample app, but we will need to change a few things to make this work with an actual app.
Authorization Flow
First let’s get authentication sorted. If you’re not using Oauthv2 then you might want to reference the docs, I’ve used it for mine.
In your root directory, create a file called authentication.js add the following code:
module.exports = {
  type: "oauth2",
  test: {
    headers: {
      Authorization: "Bearer {{bundle.authData.access_token}}",
      "X-EMAIL": "{{bundle.authData.email}}",
      "X-OAUTH-API": "{{bundle.authData.oauth_api}}",
    },
    params: {
      email: "{{bundle.authData.email}}",
      oauth_api: "{{bundle.authData.oauth_api}}",
    },
    url: "https://YOURSITE.com/api/integrations/zapier/me",
  },
  oauth2Config: {
    authorizeUrl: {
      url: "https://YOURSITE.com/api/integrations/zapier/oauth-callback",
      params: {
        client_id: "{{process.env.CLIENT_ID}}",
        state: "{{bundle.inputData.state}}",
        redirect_uri: "{{bundle.inputData.redirect_uri}}",
        response_type: "code",
      },
    },
    getAccessToken: {
      source:
        "const options = {\n  url: 'https://YOURSITE.com/api/integrations/zapier/oauth',\n  method: 'POST',\n  headers: {\n    'content-type': 'application/x-www-form-urlencoded',\n    'accept': 'application/json'\n  },\n  params: {\n\n  },\n  body: {\n    'code': bundle.inputData.code,\n    'client_id': process.env.CLIENT_ID,\n    'client_secret': process.env.CLIENT_SECRET,\n    'grant_type': 'authorization_code',\n    'redirect_uri': bundle.inputData.redirect_uri,\n    'oauth_api': bundle.inputData.oauth_api,\n    'email': bundle.inputData.email\n  }\n}\n\nreturn z.request(options)\n  .then((response) => {\n    response.throwForStatus();\n    const results = response.json;\n\n    // You can do any parsing you need for results here before returning them\n\n    return results;\n  });",
    },
    refreshAccessToken: {
      body: {
        refresh_token: "{{bundle.authData.refresh_token}}",
        grant_type: "refresh_token",
      },
      headers: {
        "content-type": "application/x-www-form-urlencoded",
        accept: "application/json",
      },
      method: "POST",
      url: "https://YOURSITE.com/api/integrations/zapier/oauth-refresh",
    },
    autoRefresh: true,
  },
  fields: [
    {
      computed: false,
      key: "email",
      required: true,
      label: "Email",
      type: "string",
      helpText: "Your email that you signed up with.",
    },
    {
      computed: false,
      key: "oauth_api",
      required: true,
      type: "string",
      label: "Access Token",
      helpText: "Find this value in your profile page.",
    },
  ],
};
You can define your own authorization headers / methods too. For mine the flow works like this:
- authorizeUrl - Redirect user to a unique Oauth redirect url from /api/integrations/zapier/oauth-callback
- getAccessToken - Get access token with ‘GET’ request to /api/integrations/zapier/oauth
- refreshAccessToken (Optional) - Refresh user’s access token with ‘POST’ request to /api/integrations/zapier/oauth-refresh
About the various parts of this file:
fields - Zapier’s oath flow takes in an array of input fields that you can specify, for example a user’s id & password. In my case I generate a unique API key for users to use with Zapier’s integration. These values must be passed during the Oath flow so that you can tell who is making the request to your api. Read about input schema in depth here.
bundle - Zapier runs your code on a AWS lambda in the cloud. It will make requests to your server with something called ‘bundle’ as an object. In bundle, you can access various things like inputData or authData, which will hold your access_token and any input data from fields when a user creates a Zap.
You will also have to define the authorization paramaters in index.js
module.exports = {
  version: require("./package.json").version,
  platformVersion: require("zapier-platform-core").version,
  authentication: authentication,
  triggers: {},
  creates: {},
};
In addition, to setup an Oauthv2 flow, you will have to define some environment variables for your app. If you’ve ever tried to integrate a login via Google or other providers, you know that you will need a CLIENT_ID, and CLIENT_SECRET.
Oath API Routes
Now for the api routes in our Nextjs13 project.
For this you will have to install ‘cuid‘, that’s what I’ve used to generate the random/unique oath urls.
const cuid = require("cuid");

export default async function handler() {

  return res
    .status(302)
    .redirect(
      (req.query.redirect_uri +
        "?code=" +
        cuid() +
        "&state=" +
        req.query.state) as string
    );
}
In the Zapier docs, the authorizeUrl step of your Oauthv2 flow simply redirects the user to Zapier from your app with some data attached so that you can make additional requests to verify/generate access tokens. You will get errors if your redirect url doesn’t contain code or state as paramaters.
Next, let’s define what happens in getAccessToken so that we can generate unique access tokens for our users.
const cuid = require("cuid");

export default async function handler() {
  try {
    //authenticate your request & see if a user has this integration already
    if (user && !hasZapier) {
      // you can define your own way of generating access & refresh tokens
      // just make sure to respond to the request with this format

      return res.send({
        access_token: my_access_token,
        refresh_token: my_refresh_token,
      });
    } else {
      throw new Error("User not found");
    }
  } catch {
    return res.status(400).send("Invalid request");
  }
}
This is the basic scaffolding for an access token request. I’m not actually sure how to generate them as I am not a security expert. So I will leave that up to you. Just make sure you respond to Zapier’s API with the above format.
Since this is a tutorial, here’s a bare bones example of the refresh route too:
import { NextApiRequest, NextApiResponse } from "next";

export default async function handler(
  req: NextApiRequest,
  res: NextApiResponse
) {
  return res.send({ refresh_token: my_refresh_token });
}
Now let’s upload our app to Zapier and try to make an authentication request.
zapier pushNow to actually redirect a user to start the authentication process it’s a little more tricky. After you’ve pushed your app to Zapier, you can navigate to the settings where you can find your app id. We will use this to construct our Zapier authorization url.
https://zapier.com/engine/auth/start/ App **172920** CLIAPI **@1.0.1**/I’ve broken down the parts of this url so it’s easy to make. The parts you will need are bolded. Your APP ID = 172920, and the version, which will be available in the CLI every time you push an update. Version = 1.0.1
Putting it all together
Add this link to the page in your app to authenticate our users.
<a href="https://zapier.com/engine/auth/start/App172920CLIAPI@1.0.1/">Create</a>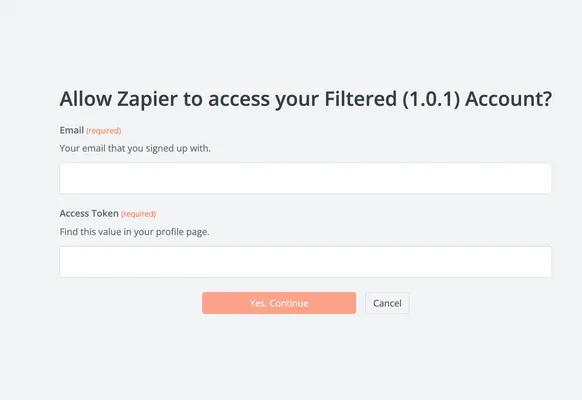
You should get a screen that looks like this:
Congrats! Depending on how you build your api routes, you can submit the appropriate data and you will see your windows close. This usually means you’re authenticated, if not the error codes will show up in the Zapier popup window.
Now we will make some triggers & actions so that users can actually create a Zap.
Triggers & Actions
Let’s go back to our Zapier project folder and create two new folders and files.
mkdir triggers && mkdir creates
cd triggers && touch my_trigger.js && cd .. && cd creates && touch my_action.js
You should have two new folders with two new files.
Before we add a bunch of code let’s understand what Zapier defines as a trigger or action.
Triggers - A way to query data from your or other api’s. For example querying your Gdrive for a file, or returning a specific worksheet. Triggers can be private (not shown to users) or open. If your app has any kind of dynamic functionality, then you will be using triggers to generate some of that response data for Zapier. Think linking a spreadsheet which could have any number of rows or columns that you want to respond to.
Actions - There’s two types, creates and search. You can create a new event, for example: send an email, or insert data somewhere. OR you can search, which will find an array of objects depending on the criteria your trigger provides.
Let’s add some code to these triggers and actions to get started. In my case, I want to generate a dynamic array of fields depending on the type of object the user selects. I’m adding this example because other one-dimensional examples are plenty in the docs.
Add this code to my_action.js
const getDynamicFields = async (z, bundle) => {
  if (bundle.inputData.spreadsheet) {
    const options = {
      url: "https://YOURSITE.com/api/integrations/zapier/get-spreadsheets",
      method: "GET",
      headers: {
        Accept: "application/json",
        Authorization: `Bearer ${bundle.authData.access_token}`,
      },
      params: { id: bundle.inputData.spreadsheet },
      body: {
        oauth_api: bundle.authData.oauth_api,
        email: bundle.authData.email,
      },
    };
    return z.request(options).then((response) => {
      response.throwForStatus();
      const results = response.json;
      return results;
    });
  } else {
    return [];
  }
};

const App = {
  key: "my_action",
  noun: "my_action",
  display: {
    label: "Run My Action",
    description: "Runs My Action.",
    hidden: false,
    important: true,
  },
  operation: {
    inputFields: [
      {
        key: "spreadsheet",
        required: true,
        dynamic: "get_my_spreadsheets.id.name",
        altersDynamicFields: true,
      },
      getDynamicFields,
    ],
    perform: async (z, bundle) => {
      const options = {
        url: "https://YOURSITE.com/api/integrations/zapier/payload",
        method: "POST",
        headers: {
          Accept: "application/json",
          Authorization: `Bearer ${bundle.authData.access_token}`,
          "X-EMAIL": "{{bundle.authData.email}}",
          "X-OAUTH-API": "{{bundle.authData.oauth_api}}",
        },
        body: {
          input: bundle.inputData,
        },
      };
      const response = await z.request(options);

      // response.throwForStatus() if you're using core v9 or older

      return response.data; // or response.json if you're using core v9 or older
    },
  },
};

module.exports = App;
Add this code to my_trigger.js
module.exports = {
perform: {
      headers: {
        Accept: 'application/json',
        Authorization: 'Bearer {{bundle.authData.access_token}}',
        'X-EMAIL': '{{bundle.authData.email}}',
        'X-OAUTH-API': '{{bundle.authData.oauth_api}}',
      },
      url: 'https://YOURSITE.com/api/integrations/zapier/get-spreadsheets',
    },
    sample: {
      id: 'spreadsheet_id',
      name: 'MY SPREADSHEET',
    },
    outputFields: [{ key: 'id' }, { key: 'name' }],
  },
  key: 'my_trigger',
  noun: 'my_trigger',
  display: {
    label: 'My Trigger',
    description:
      'INSERT',
    directions:
      'INSERT',
    hidden: true,
    important: false,
  },
};
And finally we should set up our endpoints too, to return data. Zapier is very particular about the shape of your array that your return. So be careful.
Create a route called get-spreadsheets.js in your api routes.
export default async function handler() {
  try {
        const my_spreadsheets = [{id: "1", name: "WORK"},
				{id: "2", name: "PERSONAL"}]

        return res.send(my_spreadsheets);
      }
    }
  } catch {
    return res.status(400).json({ error: "Invalid request" });
  }
}
Breaking down the flow of this should help make this make more sense. We’re creating an action that depends on a trigger to generate some fields. Our action will eventually make a post request to /payload to do something. But we want to access our spreadsheet first and see what kind of fields we need. In this case, the trigger will ping our api to get the fields ‘WORK’ and ‘PERSONAL’. Of course, you will have to define your own schema for you app.
Finally, let’s make sure to add our actions and triggers to our index.js in our Zapier app.
module.exports = {
  version: require("./package.json").version,
  platformVersion: require("zapier-platform-core").version,
  authentication: authentication,
  triggers: {
    [myTriggerTrigger.key]: myTriggerTrigger,
  },
  creates: { [myActionCreate.key]: myActionCreate },
};
Push your app to Zapier and now let’s try to make a Zap ourselves.
Finishing Up
If everything works out correctly, try to create a Zap as an ‘action’ and you should see a dropdown:
I’ve put other data in my app, here it displays their id and key.
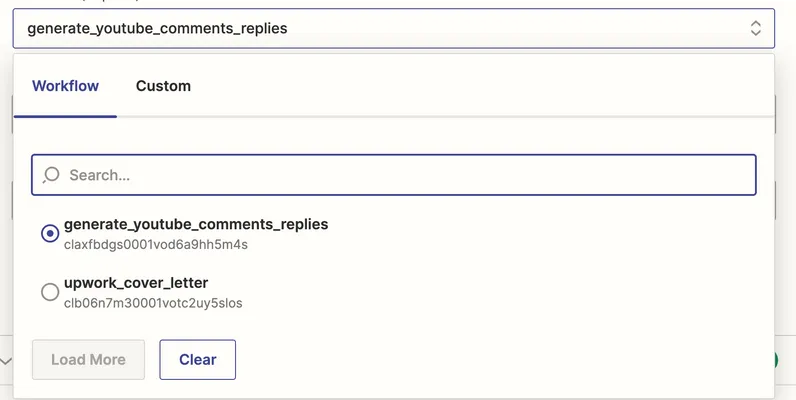
If I select one of these options a form will populate with the various input fields too.
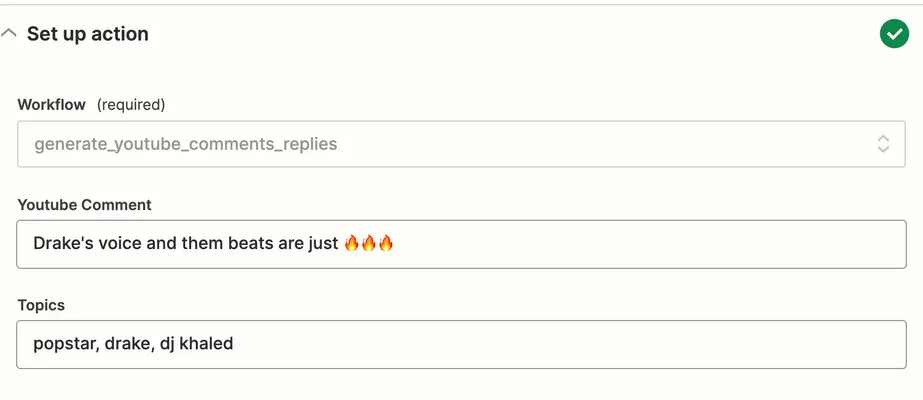
Awesome! Everything is ready to go for you to finish the Zapier integration. All you have to do now is setup how you want your api to respond to your data. If this Zap gets run, it will make a ‘POST’ request to /payload as we defined up in my_action.js
Zapier integrations have a lot of moving parts, so by breaking them down for you, I hope you can understand how it all works better. I know I learned a lot by writing this too.
Let me know if this helps & how you liked this tutorial.
-Cheers!